無人店舗向け顔認証入退室 — デプロイガイド

プリセット

A. reCamera Pro at the Door

The reCamera Pro recognises faces, decides whether to unlock, and drives the relay from its GPIO.

  • Server: A Linux server with Docker (no GPU needed) for the face library, management console and MQTT broker.
  • Peripherals: A relay module with a dry contact into the door controller's unlock input.
1

Deploy the Face Library and Console

Starts the face library, MQTT broker and management console on one server.

前提条件
  • A Linux server with Docker and the compose plugin, reachable from the door devices. No GPU needed.
  • Server clock synchronised by NTP; door devices take their time from it.
  • Ports 8080 (face library), 8088 (console) and 1883 (MQTT) free on the server.
  • Set Door Device to reCamera Pro for this preset.
  • The signing key and admin token are generated automatically; find them under "Auto-generated secrets" at the bottom of this step. Sign in to the console with the admin token.
トラブルシューティング
IssueSolution
docker compose not foundInstall docker-compose-plugin on the server.
NTP is not synchronised warningRun sudo timedatectl set-ntp true on the server.
Port 8080 in useChange Face Library Port, and use the same port in later Face Library URLs.
Port 8088 in useFree port 8088; the console pages in later steps open on it.
Face library answers 404Normal before the first enrolment.
Console does not come upRun docker logs usa-web on the server.
デプロイ方法

Deploy to a Linux server the door devices can reach.

入力が必要な項目(SenseCraft Solution アプリで入力)
  • Server IP*

    Must be reachable from the door devices.

  • SSH Username*既定値 ubuntu
  • SSH Password*
  • Face Library Port*既定値 8080
  • Console Port*既定値 8088
  • Match Threshold*既定値 0.40

    Devices must use the same value.

  • Recognition Service URL (for enrolment)

    Where the console computes face features when you enrol someone. If left empty, enrolled people will not be recognised.

  • Door Device*
    3 件の選択肢
    • · reCamera Pro
    • · Standard reCamera (2002 / 2002w / 2002 HQ PoE)
    • · AI host with an existing camera

    Sets the model tag written into every library version. It must match the device at the door, or nobody is recognised. Preset A -> reCamera Pro; presets B and C -> standard reCamera; preset D -> AI host.

  • Library Signing Key*
  • Console Admin Token*

    Used to sign in to the management console.

既定値のある残り 1 項目
  • Device Control Endpoints (JSON)既定値 []

    Standard reCamera devices to show on the console's device page. Leave `[]` for other presets.

2

Enrol People

Enrol each person with 3 to 8 photos in the console's Person Library.

前提条件
  • The admin token from Step 1.
  • 3 to 8 clear, front-facing photos per person.
  • Recognition Service URL filled in Step 1; without it enrolled people are not recognised.
  • Known limitation: people enrolled here are not yet recognised by the reCamera Pro's on-device model. On this preset the step tests enrolment and delivery only.
トラブルシューティング
IssueSolution
Enrolment refused: fewer than three imagesUpload at least 3 photos.
Door still refuses a newly enrolled personWait 30 s for the device to fetch the new version, then try again.
Rollback refused, naming a personThat person was deleted. Enrol or edit to publish a new version instead.
model_tag mismatch on the devicePoint Recognition Service URL at the door device's recognition service, redeploy Step 1 and enrol again.
3

Wire the Relay

Connect the relay to the camera and the door controller.

配線

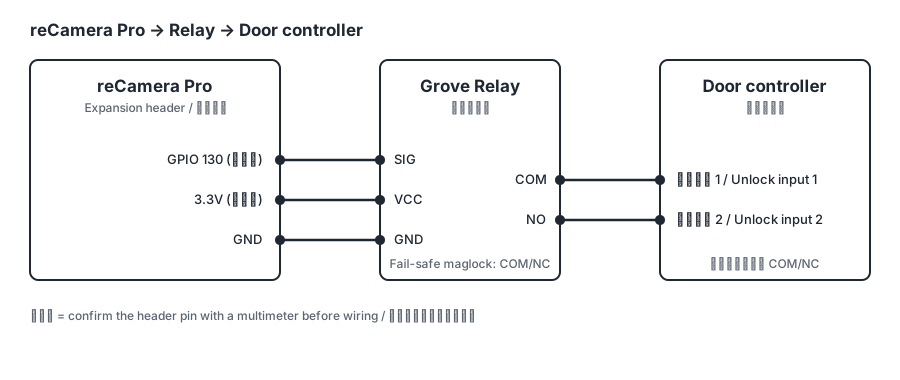
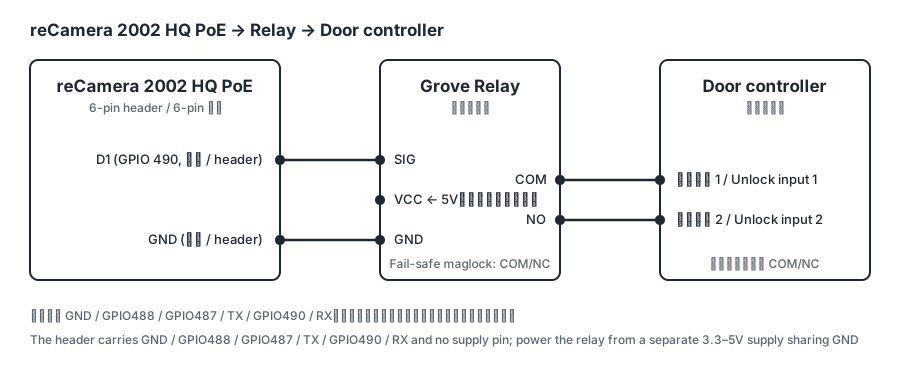
reCamera Pro relay wiring

  1. With a multimeter, confirm which header pin is GPIO 130 and that it outputs 3.3 V.
  2. Camera GPIO 130 → relay SIG, 3.3 V → VCC, GND → GND. To test first, connect an LED with a series resistor between GPIO 130 and GND instead.
  3. Relay COM and NO to the door controller's unlock input (COM and NC for a fail-safe magnetic lock).
トラブルシューティング
IssueSolution
GPIO 130 is used by another programUse a free GPIO and enter its number in the next step.
4

Activate and Configure F1 Door Access

Starts F1 Door Access on the camera and writes the door settings; any other app running on the camera is stopped.

前提条件

Install F1 Door Access (0.1.5 or later) on the camera first:

  1. Log in to the camera's web console and open the App Center.
  2. Find F1 Door Access, choose Install, and wait for it to finish.

The server IP, port, match threshold and signing key are filled in from Step 1. Enter the door name, GPIO number, relay contact and the door state on power loss.

トラブルシューティング
IssueSolution
The app is reported as not installedInstall F1 Door Access from the App Center as described above.
unknown parameterF1 Door Access is older than 0.1.5. Update it in the App Center and deploy again.
Activation times outThe first activation right after install is slow; retry once.
npu.direct is busyStop the other running app in the App Center, then deploy again.
The door opens once at power-upThe relay contact is set the wrong way; correct it and deploy again.
5

Check the Library Reached the Device

Check on the console's Devices page that the door device uses the version you just published.

前提条件
  • The door device is powered on and online.
  • At least one person enrolled.
トラブルシューティング
IssueSolution
desired_version behind the server's currentWait 30 s and reload the page.
active_version behind desired_versionRead last_error. Usually the match threshold differs from Step 1; redeploy the device step with the same value.
signature.verified is nullNormal. Signature failures appear in last_error.
clock.valid is falseNormal on devices without NTP.
A person listed under only_on_deviceSomeone enrolled on the device directly; the next version overwrites it.
The page is emptyNo device has reported yet. Check the door device is online.
6

Verify the Door

Test the door: an enrolled person opens it, a photo does not, remote unlock works.

前提条件
  • The door controller connected and at least one person enrolled.
  • A printed photo of that person.
  • The admin token from Step 1.
トラブルシューティング
IssueSolution
A photo opens the doorTake the door out of service and check the recognition service /health reports liveness loaded.
Receipt says executed but the relay does not clickCheck the relay wiring and the pin set on the device.
Relay clicks twice per approachIncrease the debounce window on the device, then test again.
Audit verification failsKeep the log file and check whether two processes write to it.
Events stop but the door still opensThe camera unlocks locally; check its connection to the MQTT broker on port 1883.
デプロイ後
  1. Stand in front of the camera as an enrolled person: the relay clicks once and the console shows an allowed event.
  2. Step back and forward right away: the console shows debounced and the relay does not click again.
  3. Hold up the printed photo: the console shows liveness_failed and the relay does not click.
  4. On the console's Devices page, click unlock: the relay clicks once and the receipt shows executed.
  5. Delete a person: within 30 s the door no longer opens for them, and rolling back to a version that still contains them is refused.
  6. Before real use: switch the MQTT broker to TLS with per-device accounts, and put the console behind HTTPS.